

Fixing Stitch Problems: Sewing Machine Stitches Not Catching
One of the worst frustrations in sewing comes when you cannot find the right fabric for your sewing project. You have a certain look and fabric you want in mind yet it is not at your favorite sewing store. That is frustrating, but it is not the only frustrating problem sewing comes with.
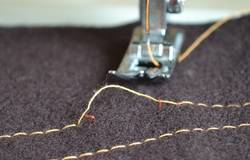
Sewing machine stitches not catching: There are a lot of reasons for this situation to take place. One is that there is something wrong with your needle. It has somehow bent or become dull during the sewing process. You just have to replace the needle.
To find out more solutions to this sewing issue keep reading our article. It is filled with the kind of information you want to know about. It only takes a few minutes of your time to learn about this and other sewing problems and your sewing may become easier to do because of this information.
Fixing Stitches Not Catching 101
Common Stitching Problems With a Sewing Machine
There are actually a lot of common stitching problems when it comes to using a sewing machine. One is that your sewing machine makes too much noise. The solution to this common problem is a little cleaning and a little oiling maintenance.
Common problems usually come with very simple solutions and that is why you should keep your sewing machine owner’s manual close at hand. Never throw it out or let it get misplaced.
The reason for that is because your sewing machine manual has a lot of simple solutions to your common sewing problems. It is a great reference book when you run into difficulties during your sewing time.
The manual has your maintenance and setting information that helps you use their machine like it is supposed to be used. If it is already lost, you can contact the manufacturer to get a replacement.
Also, make a checklist of simple places to look first. First on that list should be your needle and its placement. Then check the threading. If it is not done right, then you have a source for multiple common issues that delay your sewing.
And on it goes. Always check for the simple answer first to save yourself time and money.
Singer Sewing Machine Stitch Problems
One problem that comes with a Singer sewing machine is that the bobbin thread may loop underneath the fabric. Your stitches are not catching with the thread leaving a big mess to clean up. This issue can be solved by checking the upper thread tension.
If you need to, you may have to re-thread your machine to stop this looping from taking place. Or if you find that your machine is skipping stitches, there may be a problem with the needle.
Usually when this happens, the needle is not placed correctly or inserted all the way into the machine. You need to check this and reinsert the needle. Make sure the flat side is facing the back of your Singer sewing machine.
Another stitch problem comes when you forget to put the top and bobbin thread under the presser foot. Without this aid, your thread is too free to move about. The quick solution is to realign the thread so they are under the presser foot and placed towards the back of the machine.
Then there may be those times where the stitches look a bit distorted. This happens when you help the feed dog by pulling or pushing the fabric through your machines. To solve this stitch issue, you just need to let the feed dog do its job without help.
Reverse Stitching Problems
One thing about sewing machines is that their reverse functions are not all designed the same or placed in the same position. Finding the lever or button that handles the reverse function takes looking in your owner’s manual.
Once you find where it is on your sewing machine, check to see if the button is stuck or not. This is usually the first thing that comes to mind when dealing with a reverse stitching problem.
The second thing that comes to mind is that instead of a button, you have a lever that is not working right. You would have to unjam the lever to make sure it still works properly.
If you have a computerized sewing machine then the onboard computer processor has malfunctioned and you would need a skilled repairman to fix it. Or your feed dogs get stuck and only go in the reverse direction.
For all of these problems it is best that you take your machine in and have a qualified repairman look at it. This needs to be done when you are under warranty. Your DIY method may void your warranty if you are not careful.
Sewing Machine Zigzag Stitch Not Working

Believe it or not while the zig-zag feature on your sewing machine sounds complicated, it may not be a complicated feature to fix and get working again. When you switch to the zigzag function, you may find that it only sews in a straight line.
One thing is for sure that when the zigzag is not working right, you will not be able to do a lot of stitches. One of the simple solutions is to check to see if you mistakenly hit the double-needle switch.
This switch limits your sewing machine to straight-line sewing only. Check to make sure your machine has that switch and see if it is in the right position for your zig zag feature to work.
Also, you just may have a dirty machine that hinders your feature from performing its duties. One final cause may be that you have not done proper maintenance on your machine. A lack of oil would interfere with the performance of your zig-zag feature.
These are the more common reasons why your zig-zag feature refuses to do its job. Before you go to a professional and pay lots of money, read the next section first. Simple solutions may save you the time and the trouble.
How to Fix Zig-Zag on a Sewing Machine
If your problem with your zig-zag function is common and simple, then the solution will be equally as simple and common. For a couple of the easier problems in the previous section, all you need to do is clean your machine.
You can do this yourself or take it to a professional to make sure the machine is thoroughly cleaned and ready for work. A good cleaning solves a number of common problems at the same time.
Or you should do a little maintenance on your machine and put a few drops of oil where the owner’s manual tells you to do it. That effort will solve a number of other issues before they happen as well.
Then, if these fixes do not do it, read your owner’s manual to see what the correct settings are. Adjust your zig-zag settings if they are not in line with what the manual says. Or remove the bobbin and bobbin plate to remove any lint etc., that has fallen there.
If your cam is not broken and not part of your problem, reset the timing by adjusting the cam. Your owner’s manual will help you find its location Turn the screws clockwise to increase the speed and in the other direction to reduce the speed.
Check your tension to make sure it is not influencing your zig-zag feature. Loosening the tension may help free it up. If none of these tips help, take your machine to a professional to get it looked at.
How to Fix Stitch Length On a Sewing Machine

This problem depends on the type of sewing machine you have. Some, like the 1980s Singer 6215c sewing machines, come with gears that are made with silicone, plastic or rubber. The gear teeth eventually wear down creating the problem where you can’t adjust your stitch length.
Or the whole gear has fallen off making it very difficult to change the length of your stitch. When this happens, you should not try to fix it yourself. Special tools and a lot of expertise is needed to get the repair done just right.
The repair is also tricky and the parts may not be available to the common DIY handyman around your house. This applies to those sewers who have a computerized sewing machine.
You may not have a gear that is broken but the computer may be malfunctioning and keeping you from changing the stitch length. When this happens you need an expert in sewing machine computers to handle the task.
Why are My Stitches Loose on My Sewing Machine
There are a lot of sources for this common stitch problem. First, lint may be keeping the feed dog from getting a tight grip on your fabric. Since precision is needed throughout the sewing process, a little lint can ruin that precision and make a mess of your sewing project.
Another source may be that you are using the wrong size of needle. Or the needle is the wrong type for the fabric you are trying to sew together. Then the usual suspect called tension can be the culprit in this situation.
Check your tension to make sure you have it right. Do a little test before you start sewing to double-check your settings and make sure everything is working just right. You have to check the top and bottom tension on each thread you are using to make sure you avoid loose stitches.
Finally, sewing speed will alter your stitches and create loose ones. If you are not careful, your manual pulling or pushing the fabric will do this. You have to resist temptation to help the feed dog do its job. Manual help ruins the precision sewing needs to work right.
Troubleshooting Loose Stitches

The first thing that will be mentioned here is the last one mentioned in the previous section. Check to see if you are unconsciously helping your feed dog move the fabric through the sewing machine. If you are accidentally doing it, you will have to train yourself to be patient and let the machine do the work for you.
As for the tension issue, you just may have to re-thread your machine, top and bottom to make sure you have the right tension on the upper and lower thread. While you are doing that, check to see if your machine has loose thread or extra lint in the wrong places.
If so, just remove those items so they do not interfere with the grip of the feed dog or ruin your thread tension, etc. A little test may save you a little frustration later on when you are in the middle of your project.
When it comes to the needle, you should double-check its size. If it is the wrong size, replace it with one that is the right size. Or if the needle is not suited for the fabric you are using, just replace it with one that is.
Keeping your machine cleaned and properly oiled will help you avoid the loose stitch issue as well.
Some Final Words
Sewing can be fun, relaxing and it can be very frustrating. When your stitches do not work then your fun and relaxing hobby gets to be very annoying as well. Troubleshooting the different problems helps you to avoid the annoying and frustrating emotions.
Most of the stitch issues are common and come with very common solutions. Look to the simple first before moving to the complicated or the more expensive fixes. If you still have your owner’s manual, that book will lead you to those simple fixes and make sure you save time and money.
Using a professional repairman is usually the last resort when stitching issues are a little more complicated to solve.
